Yesterday I responded to a commonly asked question on the StudioPress support forums:
Is there a way I can import my blog to another domain so I can make edits to my Genesis child theme, then move the new design over without annoying my readers?
Since this comes up frequently, it seemed like a good idea for a post. Whether you’re using Genesis or another theme/framework for WordPress, it’s easy to create a test domain or subdomain where you can customize your Genesis child theme without making the changes on a live site.
By using a test site, you can take all the time you need to get your Genesis child theme styled exactly the way you’d like it, moving it over to your existing site only when you’re happy with it. This helps you avoid the awkward “construction phase” of changing themes so your readers only see the before and after.
What You’ll Need
- FTP access to your site’s files
- Access to phpMyAdmin via your web host’s control panel
- The Genesis framework and a child theme
- The Regenerate Thumbnails plugin and a Maintenance Mode plugin (used on your live site while you move the new child theme over)
- About 45 minutes to concentrate so you don’t break anything 😉
How to Create a Test Site
Step One: Make a backup of your site and database. And your widgets.
I use (and highly recommend) BlogVault, but any backup solution will do. Since this tutorial involves manipulating site files and your WordPress database, there is no excuse for skipping this step! Failure to make a backup could cause you to break or lose your existing site.
No, seriously. Go make a backup and put it somewhere safe. It’ll just take a few minutes and I’ll be right here when you get back.
I also recommend making a list of all the widgets on your live site, in order, in case they get wonky when you move your new theme over. I usually take screenshots of each widget’s settings, as well as pasting the contents of any text widgets into a document on my computer.
Step Two: Set up a subdomain on your hosting account.
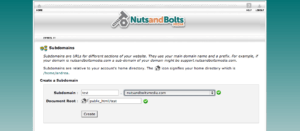
If your host offers CPanel, it’s pretty easy to set up a subdomain. Simply click on the Subdomains icon.
On the next screen, choose a name and which domain the subdomain will attach to (click any image to view larger):
Click the Create button and you’re all finished!
Step Three: Copy your existing site’s files to the new subdomain’s folder.
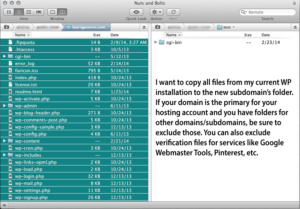
Using your FTP program of choice (I personally LOVE Transmit for Mac), copy all your site files and paste them into your subdomain’s directory. BE SURE you are copying and not cutting. You’ll want to include all the PHP files in your site’s root directory, as well as the wp-admin, wp-content, and wp-includes folders.
Step Four: Export your current site’s database using phpMyAdmin.
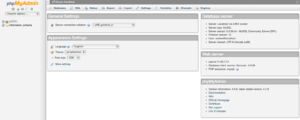
This is the part where people fall apart and freak out, but I promise it’s not too difficult, especially if your host uses CPanel. Just find the phpMyAdmin icon and click on it. You may be prompted for a login, which is generally the same as your CPanel login.
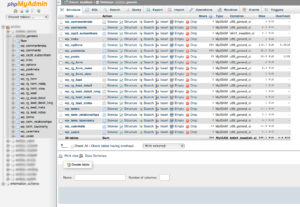
You’ll see a rather intimidating-looking screen like this:
On the left side of that screen, you’ll either see the name of your site’s database, or (if you have multiple sites like I do) a dropdown that will list multiple databases. If you’re unsure which database is the right one, go back to your FTP program, find wp-config.php in your live site’s root directory, and view it to find the name of the database for the site.
Click on the correct database name and your screen will look like this:
Never fear! Look for the Export link at the top of the screen and use it to download the .sql file for your site’s database onto your computer. You don’t even have to choose any options - just hit the Go button and it should download automatically.
Step Five: Create a new database and user.
Back in your regular CPanel screen, click on the MySQL Database Wizard icon.
You’ll be prompted to choose a database name. I recommend naming this the same thing (or close) to your subdomain so you can find it easily later.
Next you’ll be prompted to create a database user. Again, it’s easiest to choose the same thing. Use the password generator to create a secure password, and be sure to copy and paste it somewhere since we’ll need it in a bit.
Finally, you’ll get a table with a bunch of checkboxes to give the user permissions. Check the one at the top to allow all privileges (which should check all the boxes) and click the button to save.
Step Six: Import your site’s database to your test database using phpMyAdmin.
Back in the phpMyAdmin screen (you may need to refresh) you’ll see your test database in the list on the left. Select it, and you’ll see that there are no tables. Choose the Import link at the top to upload the .sql file you downloaded in Step Four.
Once you’ve imported, you’ll need to change 2 items in the database to make it point to your subdomain. Over on the left, select your test database name, then select wp_options from the list of tables.
The very first line on the right side of the screen is your site’s URL - it needs to be edited so that it shows the subdomain URL instead. Once you’ve changed it, scroll to the bottom and use the arrows and/or the dropdown to go to page 2, where you’ll change your home URL as well. Once both of those are changed, you can rejoice - you’re all done with phpMyAdmin!
Step Seven: Edit wp-config.php to reflect the changes.
In your subdomain’s folder, find wp-config.php and open it with a text editor. This is the area you’ll want to change (and don’t worry - that isn’t my real wp-config file):
Use the database name, user, and password from Step Five. This will tell WordPress which database to use for your subdomain.
Step Eight: Customize away!
Now that you’ve done all the hard stuff, you should be able to access your test site at subdomain.yourdomain.com/wp-login.php - your username and password will be the same as they are on your live site.
An important step: Be sure to check the box in Settings > Reading to tell search engines not to index the test site. Otherwise, if Google’s bots happened to crawl the subdomain, your live site could be penalized for duplicate content. I also recommend blocking all traffic via .htaccess rules or robots.txt.
Once you’re logged in, it’s time to install Genesis and your child theme, then you can start customizing. Be mindful of any hard-coded URLs in your widget areas, stylesheet, etc. - I usually make a list - so you can change them to the correct URL later. If you upload any theme-specific images, be sure to place them in the theme’s images folder so they’ll come over when you move the theme in the next step.
Step Nine: Move the customized child theme to your live site.
This is a good time to turn on a Maintenance Mode plugin and activate it on your live site. You’ll only need 20-30 minutes or so, but if you have a lot of traffic, you may not want your visitors seeing the transition stage. If your site uses a caching plugin (I love WP Rocket), you’ll want to deactivate it first so that you can (1) see what’s happening and (2) be sure the maintenance mode page will kick in immediately.
Now for the the easy part! Access your subdomain via FTP and navigate to the wp-content/themes directory. Download your Genesis child theme’s entire folder to your computer, then zip the folder. You’re now ready to upload the zip file to your live site using Appearance > Themes > Add New, with all customizations in place. (Be sure the Genesis framework is installed first!)
Step Ten: Final checks.
Widgets. Once your child theme is active, go straight to Appearance > Widgets and figure out what got moved, what’s missing, and what new widgets you added on your test site. (I keep the test site’s dashboard open in one browser and the live one open in another so I can compare easily.)
Images. If you haven’t already, install the Regenerate Thumbnails plugin on the live site. Activate it, then go to Tools > Regen. Thumbnails and run the plugin (which can take awhile). You can’t navigate away from that page, but you can open the dashboard again in a different browser tab and keep working.
URLs. Check your stylesheet, widgets, logo image, etc. to be sure the URLs are pointing to the live site and not the test subdomain. Check the front end of the site to be sure it looks the way it’s supposed to and nothing is broken.
Plugins. Did you install any Genesis-specific plugins on your test site? If so, now is a good time to make sure they’re installed on your live site so everything works the same way.
Permalinks. Click on at least a few posts and pages to be sure they load correctly. If you get a 404, go to Settings > Permalinks and click the save button.
If everything looks good and you’re reasonably sure you’ve moved your theme over correctly, you’re ready to clean up.
Deactivate maintenance mode. It’s important to turn off maintenance mode in the plugin’s settings page before removing the plugin. Otherwise your site can get stuck there, which is a real pain.
Turn caching back on. If you deactivated a caching plugin and/or Cloudflare, you can turn them back on. You will definitely need to clear all caches at least once.
Delete your test subdomain. This is good to do early on because (1) you won’t forget and (2) you’ll be able to tell pretty quickly if you missed a URL change - anything still pointing to the test subdomain will appear broken. In CPanel, click the Subdomains icon and remove the one you created, then use FTP or File Manager to delete the folder.
Delete the database and database user. In CPanel, click on the MySQL Databases icon. You can delete both the database and user in a couple of clicks.
Visit your site from a browser window where you’re logged out. Just want to be sure that visitors are seeing the same thing you are!
Step Eleven: CELEBRATE!
Congratulations! If you’ve made it this far, that means you have successfully created a test site, used it to customize your Genesis child theme, moved said child theme to your live site, and lived to tell the tale!
There’s a bit of work involved in using a test subdomain, but if you don’t want to risk a big mess on a live site, it’s the only way to go. After you’ve been through this process a few times, it does become very easy, I promise!
Do you use test sites to customize Genesis child themes? Are there any steps you would add or tips you can share with other readers? If you use this method and it works out well, let me know - I’d love to hear from you!



Comments are now closed for this article.
Great breakdown of all the steps needed - totally saving this to share again with friends down the road. I especially like the last step the best though! Any excuse for chocolate! 😀
True story! I don’t know why, but I always feel like I’m diffusing a bomb when I move a client design over. It makes no sense because I have backups, I have the test site, I have the theme’s zip, but I always feel like something is going to be horribly broken. So by the time I get done I’m ready to reward myself!
Liz says
I did all the steps above, based on your advice to use a sub-domain, but didn’t import existing database (step 6-7). I used wordpress export-import of the site files, but had to reinstall plugins, widgets, theme, etc. Is THAT why you copy that database?
Yep, that’s exactly why. Copying over all the files and the database will keep the test site identical to the live one without having to replace anything. 🙂
Liz says
This was prior to my reading this post (otherwise i would’ve followed your instructions) and you must’ve been reading my mind by writing this article since I created that test domain late last might!
That’s so funny! I try to choose post topics based on what’s relevant to the people I’m training or helping in the forums, so maybe it was a subconscious thing. 😀
I use Backup Buddy’s migrate feature to move the website to my test domain as well as back again. Takes care of everything in the move 🙂 When I chane themes I typically have to go tweak the page content as well so it’s not alway just the theme.
I’ve done that before as well, but usually not for client sites since they are adding new content the whole time I’m working on the design. I guess I could swap the databases out again before moving it over, but meh. Just depends on how much changing we’re doing.
BackupBuddy saves so much time and makes it so easy to copy and move WordPress sites.
Really useful plugin.
Very true, and one that I use often, especially when I’m copying a client’s site over to my servers to work on a new design. I’m not a big fan of iThemes overall but BackupBuddy is one thing they did right!
Hi Andrea,
Thanks a lot for the clear instructions.
I have one question though. I use the Google XML Sitemap plugin to generate the site’s sitemap. This plugin seems to generate a virtual robots.txt file, since Google can detect it, but there is no such file in the root.
To make sure that the test site is not scanned by search engines, should I disable the plugin, delete the sitemap.xml file in the root, and create my own robots.txt file and place that in the root of my subdomain? Or are there other methods without disabling the plugin?
Btw, I’m not comfortable changing the htaccess file 🙂
Your help would be much appreciated,
E!
I would definitely disable the plugin and delete the sitemap - the last thing you want to do is help Google index the test site. 🙂
You can create a robots.txt manually and place this in it:
User-agent: *Disallow: /
Thanks for the tip for the robots file. I usually just end deleting the demo site when I am done with the clients work or my own, since I am worrying about Google indexing the information. Then delete the database and db user info. This is very helpful for sites that are brand new. You can work on your hearts content. Like you stated, backup buddy does wonders. It takes less than five minutes and you can continue to test out all the themes you want. Thanks again.
I delete my test sites immediately as well, but I’ve had issues in the past with subdomains being indexed within a week of putting them up - it really depends on your domain’s age and how quickly/often Google indexes your site. At one point I had a client test site outranking the actual site in search results (which was a HUGE problem, obviously) so I’m very paranoid about that now.
Thanks for the tip. Yes it is a problem when it gets indexed. If you run site checks with Google after you have deleted those folder, they tell you that you have broken URL’s. I know many people recommend to install WP locally but right now it is just easier to do it online. I will always remember about the option to not have the search engines list the site but like you mentioned it depends on the site and its age. Appreciate your help.
Thanks a lot Andrea for the quick and adequate response.
Much appreciated,
E!
I have created a new test site and don’t have a sitemap plugin in there. Do I need to create the the robots.txt file manually? Which folder would I put it into?
You can create the robots.txt manually - just put it in your site’s root directory.
If I am going to change themes why do i have to install old theme on my test site ? What am i missing. I am obviously a newbie on this area of WordPress & Genesis. Thanks BG
Hi Bill,
If you are simply activating a stock child theme, there’s no need to use a test site. But if you plan to customize the theme heavily, as I always do, you may not want all that happening on a live site. The last redesign of this site took me about three weeks to build, so I left the real site untouched while using a test site to create my theme, decide on CSS changes, test it for mobile, etc. If you don’t make any code changes, this probably wouldn’t be necessary for you. Hopefully that makes sense.
Andrea,
I think i figured it out except for log in. It goes to development site. Just wanted to thank you again for your help. Greatly appreciated. Bill
Just wanted to note that I just did this, and you can compile steps 4-6 by simply copying your main DB to a new DB within phpMyAdmin 🙂 it allows you to set up the new one as part of the process. Thanks for the excellent tutorial!
Good point! Personally, I have never done it that way (control freak over here) but I’m sure it saves at least a few minutes during the process. 🙂
Haha. Understand! I only did it that way as a workaround initially since I did the whole setup from my iPad Mini (which makes it a bit challenging to download/upload files). 🙂
Awesome walkthrough.
One question - must I regenerate the thumbnails? If the thumbnail sizes haven’t changed from the old to the new Genesis theme, is it necessary?
Hi Jessica,
If all your thumbnail sizes are the same, there’s no need to regenerate them. I mentioned regenerating because it’s common for a new child theme to have different sizes, and that’s a question we see a lot in the StudioPress community forums. 🙂
Thanks, would it hurt to run the re generator if I don’t know if the new theme has different sizes?
No, it won’t hurt anything. Your original images won’t be touched - it just generates extra sizes if needed.
Thank you so much for writing this tutorial!! I have purchased Genesis and want to be able to seamlessly switch to using it when I have it ready. This will help so much! 🙂
You’re very welcome! Welcome to the Genesis community - there are so many awesome people and you’ll love it once you get switched over. If you need any help, let me know! 🙂
I am stuck on Step 7. I don’t see wp-config.php in the subdomain folder.
If you don’t have a wp-config.php, you can copy wp-config-sample.php and rename it. You’ll need to find the appropriate spots to enter your database name, database user, and password, and you can use this link to generate the secret keys: https://api.wordpress.org/secret-key/1.1/salt/
Hope that helps!
I’m sorry if these are stupid questions — I probably need a computer break. Do I access the files in the FTP mode then in Step 7 or someplace else. Once I got out of phpMyAdmin I got lost where to go. I really appreciate your help so much!
ok, found file and changed it, but when I go to test.mydomain.com/wp-login.php I get Internal server error 500
I just got BlueHost to fix it for me so now I have the working test site. Phew! Sorry for all the questions. I kinda freaked out.
No problem! Did you get it working?
yes, now I have a test site and the live site is still fine. Phew! Now I can take the time to figure out how to customize it. If people are commenting on posts in the meantime or I add a new post, change pictures, will I lose the comments and have to redo the changes?
Well, it depends. If you’re following this tutorial exactly, you’ll just be moving the customized theme over and not replacing your whole site, so you won’t lose any content or comments. But if you’re going to replace the entire site, you would lose any updates that happen between now and then.
Ah, ok, I think I understand that! I am basically just modifying the ‘skin’ so to speak, and will overlay it on the existing content.
Thanks,
very useful article.
I followed same procedures to create test site. I have done the following changes on test site.
1. CSS changes
2. Php changes, as I created new widget areas.
3. Changed Menu
4. The content on the test website is different then the original website.
Will copying theme folder would copy all the changes above including the ” new menu”. I have been told that I need a plugin to copy new menu.
Please if you can advise here.
The theme folder will bring over the CSS and PHP changes, but you’d need to either recreate the menu or use a plugin to bring it over. It also won’t bring over the new content. If you are completely replacing the old site with the new one, I’d recommend using a tool like BlogVault to move the entire thing.
This is very helpful, just what I’m looking for. But here’s my question. My current theme is no longer supported/updated (which is why I’m redesigning) and therefore I can’t upgrade WordPress. I’m on version 3.7. Will this pose a problem when I’m following the database steps? Or do I just copy it over to the new sub-domain, then upgrade WordPress (which will break my theme), then install the new theme (likely to be Genesis and a child theme)?
I would probably copy it to the subdomain, activate one of the default themes, then upgrade WordPress. Once you’ve done that, you should be able to install the new theme without any trouble. Definitely don’t skip the backup step since you’re dealing with an old (and potentially cranky) install!
Thanks so much - I will give it a try!
In step 3 it says to copy files across to the subdomain. My FTP programme doesn’t allow me to copy or paste, unless I am not looking in the right place.
How else can I bring across all of my current web files to the subdomain?
Hi Emma,
If you can’t copy, you’ll need to download the files to your computer first, then upload to the subdomain.
Thanks Andrea.
It’s a HUGE file so was hoping I didn’t have to download it.
I do a backup of everything regularly so are those files enough to copy over?
A backup should work fine - you’ll need to get the files in there, then create a database and update the wp-config.php file on the subdomain. You’ll also need to edit the site and home URL in the wp_options table in the database so they point to the subdomain instead of the live site. Hope that helps!
I will let you know how i get on. Thanks for the super quick reply.
Hi Andrea
If I want to have a mainsite and for example 3 subsites for the purpose of showing customers 3 different themes, can I then do it like you have described in this manual/tutorial. Just doing the operation 3 times.
I know that I can show the themes at the studiopress’ website, but if I want to put in some content that is more specific for the branch that my customers belong to, I will have to build my own demosites and I think it will be more smart to have them as subdomains at the same site instead of buying 3 new domains and webhotels for that purpose.
You can definitely set up your own demo sites if you’d like, and it’s fine to use subdomains for that purpose. You would create the subdomains in the same way and just skip the part about moving everything once you’re finished. Hope that helps!
Hi Andrea
It helps a lot. Thank you for your answer and for this tutorial.